Tuesday, May 26, 2009

Netsuite and Google Analytics How To - Part 2

Assuming you followed the steps in part 1 and have your Google Analytics code - let's plug that into Netsuite so you can start tracking your pages, clicks and sources and soon to be charted associated revenue.
Add the GA code to all of your site (most of it at least)
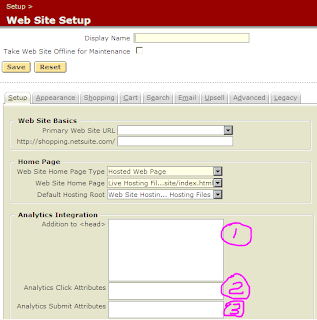
Let's go back to this screen shot from Part 1 and fill in section (1).
You should have a block of code that looks like this from when you registered for GA (with your code in the xxxxxxx-x area and missing the two lines in red that we are going to add):

<script type="text/javascript">
var gaJsHost = (("https:" == document.location.protocol) ? "https://ssl." : "http://www.");
document.write(unescape("%3Cscript src='" + gaJsHost + "google-analytics.com/ga.js' type='text/javascript'%3E%3C/script%3E"));
</script>
<script type="text/javascript">
try{
var pageTracker = _gat._getTracker("UA-xxxxxxx-x");
pageTracker._setDomainName("none");
pageTracker._setAllowLinker(true);
pageTracker._trackPageview();
} catch(err) {}
</script>

The code in red is what tells GA to allow your-domain.com to pass the information along when we hop over to the netsuite.com domain for checkout.
Now - take that modified block of code and put it in section (1). When you press save - you have just added GA tracking to every page that's hosted from the store and managed via the Content Manager interface... You will need to manually add that code snippet somewhere on any of the html pages or forms you may also have hosted inside Netsuite. (A trick to this is to make a custom tag - put the code in the tag - and then just add the custom tag to the content... so if you ever need to change this it's only in one place).

Add the "magic code" for the cross domain hop
This single step right here is the real meat of Netsuite 2009.1 - it's this simple step that makes this work... whereas prior to 2009.1 you either had to hand code this or find a provider to do this part for you. Past the following code into section (3).:
onSubmit="javascript:pageTracker._linkByPost(this);"
That's it - SAVE away.

Enable e-Commerce in Google Analytics
This is an easy one to miss - and the simplest component of this second post- you need to log into Google Analytics, go to Analytics Settings>Profile Settings>Edit Profile Information - and select "Yes, an E-Commerce Site

If you never come back here - you will have nearly 100% working integration with these simple steps.

Up next post - the magic code that is "missing" to add the revenue reporting on checkout. I will make it as simple as cut and paste (sorta).

Wednesday, April 29, 2009

Netsuite and Google Analytics How To - Part 1

This is the first of a 3 part series on how to integrate Google Analytics (with eCommerce Support) into Netsuite version 2009.1
In part 1 we will talk about the basic components of setting up the analytics integration, in part 2 we will actually perform the configuration and part 3 I will provide some custom code to capture the contents of the shopping cart for reporting within Google (valuation of clicks - something you would have to "write" yourself)
This tutorial is going to assume you understand a few things - so let's get that out of the way first:
1) You already have a or will set up a Google Analytics Account 
2) You are running Netsuite version 2009.1 or later
3) You are comfortable with some basic HTML and JavaScript work - no heavy coding, just some cut paste and simple modify
4) You understand that sometimes to make things work you have to bend the rules (you will see what I mean in a bit)
Get your GA on!
The first and foremost important step is to go get signed up for a Google Analytics account.  It's simple - free - and one of the best analytics packages out there - www.google.com/analytics is the place to start.  Once you go there and sign up with the domain you want to start collecting data on one of the screens will talk about installing the "code" into your site.  There's 2 things on that page you need to understand: 1 is your Web Property ID (UA-xxxxxx-x looking thing) the other is the tracking code you need to insert into you pages (it's a block of JavaScript)
We will be using this in part 2 of the tutorial.
The Netsuite Piece!
Within Netsuite there is a place under 2009.1 for configuring most of the Google Analytics Integration...  and I have included the screen shot showing the 3 sections that matter:
(1) This  is where the code provided by Google will go (this will be a cut and past step).  What this will do is load the Google JavaScript code and then populate it with your unique identifier...  We will be making a small change to the code in this step because of how the Netsuite checkout process actually crosses from your-domain.com to netsuite.com - easy - just wait for Part 2 - I'll show you the tweaks!
(2)  This field here adds some special code to the "Add To Cart button" that you can use to capture button presses.  We won't be spending a lot of time on this one now - that's a slightly more advanced configuration item...
(3) This field is the "magic" field that until Netsuite 2009.x made Google Analytics integration very - very difficult.  This field here is what will populate the "Proceed to Checkout" button with the special code that needs to be present for Google Analytics to cross a domain structure (that your-domain.com to netsuite.com part).

So what's in store - well - I'll be releasing part 2 and part 3 of the "How to make Google Analytics work with Netsuite"tutorial over the next week or so...  please sit tight - get you Google Analytics account registered - and get ready to start making better decisions based on data!

Monday, April 20, 2009

Netsuite Pages Loading Slow - why?

Here's a tip that flew by un-re-tweeted today:

If you are concerned w/ page load times and things seem generally slow...  and you don't know what the issue is (it's not you, it's me syndrome)
Try this: double click NS logo top left of any pages you are in (obviously this is when you are inside Netsuite - not a web store page) - this nifty little window will pop up and help you figure out if the problem is a slow server, slow network, or that nifty GUI enhancement you are running in your browser that's making everything slow for you.  At least it give you a starting point for troubleshooting.  It would be SUPER terrific if Netsuite was to add a specific server identifier for their cloud - so when you see server at 100% - you could call and get moved...  but for now - this is a lot better than just watching the browser spin!

Thursday, April 16, 2009

Quick Tip - via Netsuite on Twitter

Twitter is cool - and by following @NetSuite_Inc or @fishpick (that's me) - They tweet cool "tricks" and I'll try to reTweet the extra good ones...

Here was yesterday's:

In Global Search, use % sign as a wildcard. Ex. cu:john% would return results like johnson, johnston, johnny

The cu: in the string is for the "Customer" type - obviously john in the string is what you are looking for and the % is the wildcard (all you DOS fans - let go of the need to use your *.*)

You and the Netsute RSS Feed - again

Unlike Google and most other SaaS providers out there in the marketplace - when Netsuite says Beta - they apparently really mean it...  which is all fine and dandy...  but until you understand WHAT the beta limitation is...  well - you know the rule about beta software in production!
Here's the simple deal - the RSS feed works EXACTLY the way you would want it to - and I have already talked about how to leverage the feed generator here.  What I failed to mention (because at the time I was unaware) is the fact that in the current 2009.1 version of the RSS Feed system - every time you add a new entry to the feed - EVERY SINGLE ITEM in the feed gets the new publish time and date.
While that may not sound overly ugly at first - understanding that many RSS readers and consumption engines determine content freshness by date of publish...  well - that makes for a pretty ugly scenario.
For instance - imagine you subscribe to a feed somewhere - like a news site...  and every time there is a breaking headline (or any new headline) added to the feed everything old becomes "new" again...  around the holidays when you have nostalgia for things old yesteryear - maybe that's not all bad...  but in the case of providing a consumable service - it's not good.
So - for now - all my prior recommendations about using the RSS Feed generation tools stand - but I would recomend, until this is out of beta, that you then take the content from the feed - create a flat XML file - and point visitors to your site to THAT content...  then when you have new content - by all means generate the correct XML file within the Netsuite tool - then simply append the new content to the flat XML file to retain all the previous time stamps.

Friday, March 27, 2009

The Product Feed - Where the owners manual FAILS

I think the section in the help files is called "Setting Up Web Site Product Feeds" - and it just sounds so simple...  it's almost unlike any other section in the manual - short, concise, screenshot, the end.  Only issue is - it just doesn't work that way (well it does - but there are several other steps first to get a product into the feed correctly) - and since this is a GREAT way to increase your product exposure using things you have already put the time into configuring - let's walk through one example - Google Base (since it's free) - end to end.  So let's get to the steps:
  • The assumption here is you have already configured your products inside Netsuite and they have pages in your web store
  1. For each product you want to include in the Google Base feed (or any feed) for to Lists> Accounting> Items and click Edit on the item.  Click on the Store Tab and select the feeds you want the product included in from "Product Feed".  (Frankly - unless you have specific plans - I'd just add all services now).  Save the item.  Do this for all items you want in the feed.
  2. Now go to the other end of the menu system and select Setup > Web Site > Product Feeds.  Select Google Base from the listing.
  3. What you have here is basically the results of a hidden Saved Search for these products - in a pseudo usable format.  Now - don't panic if items don't have the correct product type listing - we still need to massage the listing for Google Base.
  4. Using the magic of Netsuite - Click "Edit this Search"...  we are going to change the results from this search to have the correct Google Base headers and information (accurate as of 3/2009) - here's the link to Google for the "required / optional" headers.
  5. Save the search with a Name so you can use this in the future - maybe "Custom google Base Feed"
  6. Head to the Search Results tab and add in the field "Vendor Code" - or whatever you have for your items that is your unique internal ID for the product.  Assign it a custom label of "id",  This is one of the required fields that Google Base needs - but it not part of the output.
  7. At this time - you can refer to the link in step 4, select any of the optional headers you wish to populate in your Google Base Feed and add them in the same manner as adding "id" in step 5
  8. Now - obviously there are lots of important fields here - but description is the one you really want to pay attention to - THAT's the field Google will index for search results...  if you don't like the content or want better content than the saved search is pulling off your item description - that's OK - next we will clean up this feed to make it super wonderful. (now - if you are going to be pumping this into Shopping.com or other places that consume live feeds - you will want to fix the item itself)
  9. Export the list using Export-CSV and save the file...  we use CSV because Google Base won't accept Excel files.
  10. Now - you can change things in here as you see fit - as I already mentioned the description is important but you might also want to change your "product type" to match the listings of the Google categories - check this out for guidance and auto-generation.
  11. When you open your file there will be the following headings: link, title, description, image_link, product_type, price, brand, condition... Make sure things make since - at the time of writing this - Condition is NOT correct.  Use your eyes and the tools in the links above to "scrub" the output to be accurate - and if you have other pieces of information as you learn the attributes for Google Base - go back to the Saved Search and add them in there for future feed generation.  there is no easy way to do this part - it's a lot of trial and error to get things the way you want them.
  12. When you are done - save the csv file that you worked so hard on as a TAB DELIMITED file - this is key in getting Google Base to accept it.  And a nice tip here is - save it as a friendly name because you will have to name it that inside Google Base as well.
  13. Head into your Google Base account and just work through the New Data Feed screens.
I'd say "and that's it" - but this isn't exactly a 3 step process - but - if you follow these steps you will end up with a file that Google will accept and incorporate into their Shopping searches.
And take notes.

(What is Google Base? - it's a free directory of products that google indexes and compares prices for consumers - sometimes refereed to as Froogle, sometimes as Shopping.  Bottom line for your products - it's a free service you can register for and increase your exposure.  Ever Google for a product and see those  or so listings with prices below the AdWords and above the actual search results - that's Google Base...  so for all your SEO work - here's a easy Netsuite friendly way to get a "top search result" with minimal work)

Promote your content - via twitter - and KNOW!

OK - you design a nifty Netsuite web site (tips and trick on doing that in Netsuite will be coming - plus there are a bunch of websites out there who will help you design some very snazzy sites - this is more about you doing it MOSTLY yourself).
So - you have this website with commerce behind it - and it's fully instrumented with Google Analytics...  right? (Post on how to pull this off is coming)
You have built an submitted a Sitemap to at least Google - right?
And now you want to leverage the community of friends / family / followers / whatever you have in YOUR social circle - so they can promote it too...
Here's a challenge - maybe you have some content within your Netsuite hosted site - maybe it's multiple domains - maybe it's a form - but it's SOMETHING and the URL is Netsuite UGLY!  What to do...  and how to know if it works when you do - do it?
To the rescue - Google, tunyurl.com and Twitter...
The combination is actually pretty simple to pull off in a few simple steps:
  1. Take the ugly Netsuite URL you are not a fan of and plug it into the Google URL builder - here
  2. Take the result of the above tool with the tracking information now appended to the URL and past that whole blob (techically a string - but whatever) of consumer repulsive ugliness into www.tinyurl.com - and poof - some long URL string that could have easily been around 100 characters is now down to 25 or so.
  3. Take that tinyurl you just generated and Tweet away - email to your friends - the works.
Now - I wouldn't recommend sending this off to your customers in this form unless you are responding to a Tweet for information and this makes it deliverable...  or if you are engaged in something  that makes passing this URL acceptable.  What you gain in flexibility due to the small size is lost in the recognition of your domain...  so use this judiciously...  but - if you find there are customers or leads in the land of Twitter that ask for information - and the Netsuite URL is too long to tweet back - this is a powerful combination that can ultimately tell you - do people CARE about my responses?